Check out my other flashlight blog at: http://otherflashlights.blogspot.com/ More content coming soon.

Friday, September 22, 2017

1982 3C Mystery Self Defense Light

Summary: This light has a very well made unique end cap that I believe was intended to be used for some sort of self defense.

Most lights in my collection I'm able to research and find out a good bit of info on. This research is mostly through other collectors I've met and from folks in the industry that include former dealers and distributors as well as people who have worked for Maglite and other companies. I only have one other light that I've not been able to get resolution on, a 6D light with an odd serial number. I also have this 3C:


Aside from the end cap the light is a very standard 1982 3C, serial number 62,351. The light has the early standard TM bezel and it is stamped "Patented Made in U.S.A." opposite the serial. These details can be used to help date the light as a 1981 to 1985 model. It also has the older style flat end cap and not the later "store-a-bulb" style but that is where the similarities stop. Pressed or glued on over the standard Maglite end cap is a solid bare aluminum knob. The knob is pretty heavy and I'm not sure what purpose it would serve. 


What's also very strange is Maglite hasn't been able to provide a production date. If you send Maglite an e-mail with the serial number of a light they will tell you the exact date a light was produced. 1979 and 1980 lights are an exception because the record keeping wasn't very good in the early days. However, from 1981 onward I've always been able to get an exact date. I've inquired 3 separate times over the past year and I either get back a ~2005 date, which is way too new, or that they don't have it on record. I've dated the light myself based on my C Cell Quick Dating Guide and other similar serials I've sent to Maglite.


Judging by the wear I think it's been on the light for a long time. It fits so good and looks professionally done so I doubt it was a home project or the result of a personalized light. Mag Instrument has no record of producing an accessory like this and I could not find any part number for it in any of the old literature I have. I also spoke with Mag Instrument employees that were there during this time and they did not remember such an accessory being produced either for retail sale or as a prototype.

I also researched out other companies like Safariland and Monadnock that have produced police equipment and accessories for flashlights for a long time but I still didn't have any luck finding any info on this particular accessory. Other collectors have speculated it's intended to make the Maglite more of a weapon either by increasing the weight of the end or providing a grip like a baseball bat to help swing it. I don't see either being very effective though. Most officers also carried the light on their duty belt and this setup will not fit through any standard belt holder.


I purchased this light from another collector who purchased it at a second chance shop in Michigan. The prior owner did not have any info on it so I didn't luck out there either. I hope you enjoy this one of a kind Maglite and if you have any information on this light please give me a shout. My contact info is on the right and I'd love to hear from ya.

As always I'm looking to buy Vari-Beams and Vintage/Rare Mags. Please let me know if you have any, top dollar paid.

Saturday, September 16, 2017

AMC TV Halt and Catch Fire 5D Light

Summary: I supplied a 1990 5D to a prop master working on AMC TV's Halt and Catch Fire. The light was featured in Season 4 Episode 4.

Those who follow my blog will know that a while back I sold one of my 1990 NIB (new in box) 5Ds to a Prop Master working on the AMC TV series Halt and Catch Fire. I said in that post that I would do a new post once the episode aired. Well, it has! The show is a period drama from the early 90s about the early tech industry and the Prop Master was looking for a light correct for that time. The light I sold him was a brand new 5D, serial # 50668619. The episode is number 4 of season 4 titled "Tonya and Nancy" and aired on September 9, 2017.


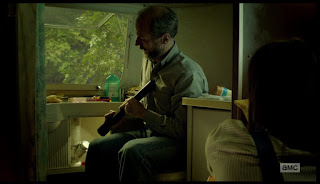
In this episode one of the main characters, Cameron, buys a trailer on a piece of property out in the country to escape the big city. Unfortunately she isn't very handy and has some trouble with the plumbing. Her co-worker, Bosworth, comes to bail her out and fix the plumbing. Of course like any worthwhile plumber he comes equipped with his trusty Maglite. At the end of the scene he lends her the light in case she needs it in the future. Shown below are a couple stills from this scene.


I've been collecting for a while and It's quite an honor to have one of my lights appear in a network TV series. I doubt anyone will take me up on the offer but I am always available for flashlight consulting work both on the big and small screens! I'm not quitting my day job in the meantime but my contact info is at the right. CPF, Candle Power Forums, also has a pretty neat thread about flashlights in movies and TV for those who are interested. I can only hope that season 2 of Stranger Things has Hopper using a Maglite instead of an Everready. Thanks for reading guys and if you happen to spot a Maglite in a TV show or movie please be sure to share.

As always I'm looking to buy Vari-Beams and Vintage/Rare Mags. Please let me know if you have any, top dollar paid.

Tuesday, September 12, 2017

1982 4D Australian Light

Summary: Maglite sold lights to industry and governments as well as consumers. This light was sold to the Australian military as part of a large contract order in 1982.

I thought I would post about another light from my collection. It's not one of the most interesting or rare but it does have a good story. At first glance it looks like a regular old run of the mill 1981 to 1986 4D. It is serial 135,907. For those interested in the dating of the light I've covered that in my Quick Dating Guide. So, what makes this one special? For starters it is brand new and has never been used. It was ordered in 1982 as part of a large lot of approximately 2,000 or so lights by the Australian government for use in emergency preparedness packs for soldiers. Most of them went unused and were later sold as military surplus. They pop up once in a while on the large auction site and many were used by Australian citizens who purchased them on the cheap and were in need of a durable light.

This is a good example of Maglite's early push to expand beyond the U.S. market. While the U.S. market accounts for a majority of the sales each year Maglites are known globally as the gold standard in flashlights. While other manufacturers were selling only to the U.S. law enforcement market Maglite was one of the first durable premium flashlight manufacturers to expand and see the untapped potential in civilian and global sales.

So, here is my Australian 4D. The light is brand new and has never been used. It bears no special markings but did come with the sleeve that was issued in the emergency preparedness pack. The sleeve was produced by another contractor and is in the DPCU print, Disruptive Pattern Camouflage Uniform print, also known as Auscam or Jelly Bean Camo. Unfortunately I don't know, or have a picture, of the contents of the rest of the emergency preparedness pack. I've heard that it was to be issued in the event of a natural disaster and contained other items like MREs, meals ready to eat, matches, and other survival items.


I should also note that Maglite has a long standing association with the military because of their durable, long running lights. I have 2 other military lights, one 2C light produced on a special order for the U.S. Air Force and a 2D customized by a U.S. Airman.

As always I'm looking to buy Vari-Beams and Vintage/Rare Mags. Please let me know if you have any, top dollar paid.

Wednesday, September 6, 2017

Adventure Sport Custom High Output Maglites

I don't do too many posts about new lights but I did purchase one recently that I was absolutely thrilled with so I thought I'd do a review. It's an Adventure Sport high output LED Maglite conversion. Adventure Sport is pretty well known in the flashlight world for converting Maglites and Surefires to lithium ion powered high output flashlights. What do they mean by high output? 2,000 to 5,000 lumen LED lights! Your average incan Maglite is around 100 lumens and LED around 300 lumens so these are 10 to 50 times brighter than those.

You're probably wondering why do I need something that bright? Well, I'll be honest most folks don't and it's not that practical but they sure are fun! I have mine mainly for the wow factor and occasionally camping and exploring the woods late at night. The really nice thing about these conversions is that they are programmable and offer different mode groups. This means you can use the light on low, medium, and high modes which makes the light a whole lot more practical. A list of the modes as well as models is available on their web site at: http://asflashlights.com/18-led-upgrades-for-maglite I often find myself using the 1%, 25%, 100% mode group which provides 40 lumens, 1,000 lumens and 4,000 lumens on my 4,000 lumen conversion.

Adventure Sport currently offers 2 flavors, a 2,000 lumen conversion or a 5,000 lumen conversion. The 2,000 lumen unit can be used with 3D cells on a stock incan Maglite or on one of the 1 cell cut down lithium ion models sold by Adventure Sport. The 5,000 lumen conversion can be used with 6D cells on a stock incan or a 2 cell lithium ion model sold by Adventure Sport. These conversions are of the 3 LED variety which cast a ton of light. I have an older 4,000 lumen single LED XHP-70 conversion with 2 lithium ion batteries. It's a shame Adventure Sport no longer produces these because they throw much farther than the 3 LED models. Shown below is my Adventure Sport.


So how bright are they exactly? Well, see for yourself. Shown below are pics of a stock incan 2D rated for around 30 lumens. A Malkoff drop in 3D rated for around 600 lumens and the Adventure Sport conversion on full blast at 4,000 lumens. The tree is about 30 feet away from my position. In the last pic you can see how much brighter the paver patio is due to the enormous amount of spill from the XHP-70 reflector.


Not only does the light shine bright but the parts are quality as well. The heat sink is machined from a solid chunk of copper, a PVC sleeve is added, and the tail spring is recessed into the end cap to make room for the 26650 batteries which are slightly longer and thinner than D cells. The new 3 LED setups are sweet as well and quality is second to none.


So, what's the verdict? Well I gotta be honest, I find myself using the 40 and 1,000 lumen modes the most. For working around the house or on a car sometimes even 1,000 is too bright. A lot of the light winds up being reflected back and is rough on the eyes. I find myself using my Malkoff with a 600 lumen LED the most and 600 lumens is about perfect for most work. The wow factor on these lights is second to none but the price is a little tough to swallow for most at $200+. If you have to have the baddest light on the block or are doing frequent search and rescue this is the light for you. If you're planning to use it for work there are probably better suited, less expensive lights. All in all it is a heck of a light and I wouldn't be without one in my stable. I plan to buy a 2,000 lumen 1D soon.

You can't go wrong with Matt at Adventure Sport. Check out his Youtube channel too at: https://www.youtube.com/user/ForgivenMatt He does awesome, fair reviews on competitors lights and flashlights in general.

As always I'm looking to buy Vari-Beams and Vintage/Rare Mags. Please let me know if you have any, top dollar paid.

Friday, September 1, 2017

Switch Disassembly, Repair, and 1980 5D Restoration

This is part of a series of posts I've written about common Maglite repairs. I've also covered the following topics:

Removing Battery Corrosion and Straightening Bent Lights
Stuck Batteries
Stuck End Caps
Stuck Retaining Rings
Switch Removal and Stuck Switches

Disclaimer: I'll start out by saying that these repairs are tedious and challenging. It is very rewarding to make an old Maglite light again though. If you have a special light and don't feel up to the challenge I do restorations and custom work on most vintage flashlights. My contact info is at the right side of the page.

____________________________________________________________

When a Maglite fails to light some of the problems are fairly obvious. Dead batteries and bulbs are fairly obvious solutions and those are easily diagnosed by changing the battery or bulb. Maglite even has it's own factory service manual which can be found here. But what should you do whenever everything appears normal but the light will still not light?

This is a fairly common problem I've encountered on restorations and I've run into it on a 5D light I'm restoring for someone currently. As you can see there is no visible corrosion or damage but still it won't light.


The common sources of this problem are internal corrosion of the switch or corrosion of the tail spring. If you have an extra working switch and tail spring they can be easily swapped to diagnosed the problem and most users opt to purchase a new switch at a cost of around $12 rather than try to diagnose the non-working switch. This is an easy, inexpensive fix but I'll still go into how the switch mechanism works and how it looks as well as some simple fixes. I prefer to leave the light as stock as can be and always try to fix parts over replacing them.

To understand how the switch works we must first understand how the light works. In order for the light to work current must flow from the negative side of the battery to the positive side.

1 - The positive side of the battery sits up against the switch and the current flows up to the plunger.
2 - The plunger opens and closes the circuit.
3 - On the opposite side of the plunger the circuit picks up again. This connects to the positive terminal of the bulb. If you look closely you can see that this terminal is wrapped in a plastic insulator. This insulates it from the housing of the bulb which acts as the negative terminal.
4 - The housing of the bulb then connects to the negative contacts that slides along it when focusing.
5 - This is connected to the body of the light through the set screw.
6 - The body of the light is connected to the tail spring and back to the negative side of the battery and the circuit is complete.


You'll notice that this switch is specifically for a non-letter serial light. However, all flashlights work in the same manner. Most aluminum and steel lights flow current through the body. The voltage of the batteries is relatively low so you won't feel a shock as the current is drawn back to the negative terminal of the battery rather than to ground. Because the batteries generally have a low voltage any internal corrosion of the switch or tail spring will usually generate enough resistance to stop the flow of current. That is the case with this 5D I'm working on.

So let's take a look at a working Maglite to see what kind of resistance we're talking about. Shown below is an multi meter set to ohms (a measure of resistance) hooked to the positive and negative side of a new switch. As you can see it reads about 11 ohms. It should be noted that the switch must have a good bulb in it and the switch must be in the on position otherwise the ohms will not register.


The body and tail spring will provide negligible resistance. Checking the resistance between the edge of the end cap that is not anodized that sits up against the very end of the barrel and the end of tail spring confirm this as shown below. Typical resistance is around 1 to 5 ohms depending on the amount of corrosion on the spring.


Now we have a good baseline. We know that ideally the circuit operates with a nominal resistance of 11 ohms. So let's take a look at the light I'm working on and see what kind of resistance it has and I'll see if I can get it's resistance down to the resistance of a good assembly. Shown below is my switch removed from the light and hooked to my multi meter. This removal process can be found here and elsewhere on Youtube.


You can see that the switch has infinite resistance which means there is a part that is not making a connection somewhere or is missing and is inhibiting the flow of current. Next I'll open up the switch and test the individual parts to see if I can find the culprit. This process will be detailed below. All of the values obtained should add to be the total resistance of the switch. If you have a resistance of 60 ohms and you find one part that is 45 ohms you can stop testing because that part is the problem.


As can be seen below the positive battery contact to the positive bulb contact across the plunger has an infinite resistance when engaged. This is most likely the culprit. However, I'll clean all of the electrical contacts as shown below to ensure the circuit operates properly. I'll soak these parts in vinegar and then wire brush them. DO NOT soak steel parts in vinegar because they will corrode. Make sure you only soak the parts shown below as they are copper and aluminum.


Pay extra attention to parts that have visible corrosion as the corrosion is the likely cause of the higher resistance. The set screw and negative bulb housing contact as shown below are a likely culprit as well. This contact rubs the bulb housing and the wear causes it to corrode or the set screw itself corrodes because of the dis-similar metals contacting each. See below for an example from this light with a lot of corrosion.


Shown below are the cleaned up parts. The copper parts should shine like a new penny and you'll notice the resistance is remarkably lower.


Shown below is the resistance test of the switch after I put it all back together. You'll notice it is only 0.8 ohms which is basically the resistance of the bulb. Why the difference vs. the "new" switch above at 11 ohms. Well mainly because the copper parts will naturally oxidize (corrode) over time due to even the most minuscule amounts of moisture in the light which ups their resistance. Right now the light is clean as a whistle but with normal use and exposure to the atmosphere the copper parts won't keep this shine. That's ok though. The corrosion stops after a natural layer has formed and the switch will average out at around 11 ohms.


Maybe you've found the switch has the same resistance as a new switch or that the light still won't work. The next item to check is the end cap and spring. A lot of times if there is a lot of resistance you'll notice that the spring is corroded, the spring seat is corroded, or the non-anodized edge is not making contact with the end of the barrel. All of these items must be completely free of corrosion so that their surfaces all make contact.

With all of the parts now free of corrosion did this light shine again? Judge for yourself in the pic below. So, why did I save this light? Well, another collector I deal with asked me to. Also, it is stamped "Paten Pending" opposite the serial number and lacks the features of a 1979 light so it is a 1980 light. It's from only the second year of Maglite production and is serial number 49,126 so it is relatively low. Please see my Quick Dating Guide if you're interested in these details. The light is nearly 40 years old and in excellent condition other than the non-operable switch so I figured it is a worthwhile restoration especially because someone valued it all these years to keep it going. Here are some pics of the light after it was all repaired.


This light came from a fellow collector who picked it up at an estate sale with the above accessories as well. The estate was from the owner of a large Tennessee construction company and this was likely a personal light of his. A personalized 1980 3D also came with it. The 5D bulb is an old "Safari-Star", a knock off of the Magnum Star Maglite brand produced by police equipment company Safariland. The Maglite belt suspender carriers the old Maglite logo embossed into the leather and on the package so it is from 1980 to 1984. This will certainly make a nice addition to his collection now that it's all back in working order.

As always I'm looking to buy Vari-Beams and Vintage/Rare Mags. Please let me know if you have any, top dollar paid.